Having considered the available space for storage of the track when it is not in use it will be neccesary to ensure it is as light as possible. Looking at the available options it is intended to purchase 16mm aluminium rail in 2.5m lengths and utilise the plastic sleeper and rail chair system available from PNP railways. Due to the layout of the garden path it will be neccesary to incorporate a dog leg curve to offset the track by @1m as it nears the house. This will enable a running length of @ 20m from the garden gate right up to the back door of the house. With the maximum width of the garden at less than 4m any kind of loop is unfortunately out of the question and any more ambitious plans will have to wait for a move to a house with a larger garden.
Jan 06; Having dug out the body of the passenger car started years ago and stored, two boxes of pressure treated softwood sleepers were also found. These had been cut from roofing batten to a length of 12" and there were @ 400 in the boxes, plenty for the proposed project. Having already got a ready supply of sleepers the purchase of plastic ones was dismissed to cut costs. It had been decided to pitch the sleepers at 6 per metre but on reflection this was increased to 8 to give the rails better support and hopefully make the track more robust, this gives a requirement of 160 sleepers. The plastic chairs produced by PNP were viewed at the Alexandra Palace Model Engineering Exhibition Jan and 400 were purchased - more than sufficient for the project. Although the wooden sleepers had been produced from already treated wood and the track was unlikely to be stored outside for protracted periods, due to it's temporary nature, it was decided to soak them all in creosote to improve their appearance. A soak tank was produced from an old plastic 25l drum with the top cut off, the sleepers inserted end on and weighed down with an old sash weight (cut in half) placed on a small sheet of metal plate to prevent them floating. Black creosote was then poured in up to the top, each batch will be left for 2 weeks to ensure they are well treated before being removed to a drain tray for drying.
May 06; Owing to an increase in free time due to uncertain work commitments and the passenger car complete except for final assembly after painting, manufacture of a brake operating link and completion of the couplings it was decided to put in order for the rail. A costing excercise had been done towards the end of 2005 and the Miniature Railway Supply Co (MRSC) (see links page) found as the cheapest source. A further scan round the internet in April revealed that this was still the case. A telephone call to Jeff Price resulted in the purchase of thirty one 2.5 metre lengths of 16mm (5/8") flat bottom aluminium rail, fishplates and bolts and some more rail chairs. I found them extremely helpful, the purchase went smootly via Paypal (they don't accept credit cards) with delivery being effected the following day. I can thouroughly recomend MRSC to anyone contemplating such a project (and they dont just do rail!).
The observant among you will have noted first the odd number of rails and second that 31 lengths produces more than 20m of track - well spotted! The answer is that when complete I will actually have 37.5m (123 ft) of track which as it is portable will be able to be used in other locations than the garden. The odd length of rail is for construction of a point. Whilst I have been completing the passenger car I have been pondering the track and how perhaps to improve operating interest. Hence it has been decided to construct a point with the main run of the line down the garden from the gate terminating in two parrallel sidings served by the point. Originally it was envisaged just to kink the line over to continue the run past domestic obstacles to the back door of the house but wanting to get as much line as possible in the space it was decided the kink could be achieved by a point as there was also room for a short siding parralel to the main line. Eventually it is hoped that two trains can be run taking it in turns to run the length of the line - but this will need a second passenger / driving car!
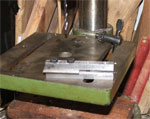
Having recieved the rail and having purchased it unpunched at the ends for the fishplate bolts the first task was to manufacture a simple drilling jig. The reason I purchased unpunched was two-fold, it saved an extra pound in cost per length but also I wanted close control over the spacing between the rail ends and as the track is semi portable I wanted to make the joins as rigid as possible, expansion not really being an issue as the sleepers can just slide on the concrete path or the rail slide through the chairs. The jig was made using two pieces of 8mm sq BMS and a small piece of plate sandwiched between, clamped together with 5mm fitted bolts. The hole spacing was marked out from the fishplates and designed to give a maximum 1mm gap between the rail ends to ease assembly. The jig pictured below on the left slides onto the web of the rail as shown below on the right, placed on the drill table and the holes drilled through the guide holes in the top bar.
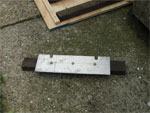
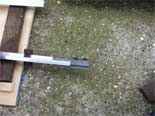
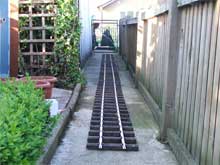
The next job was a simple gauge to check / set the gauge of the rails. This was produced from a scrap piece of aluminium plate with two slots accurately filed with 0.1mm clearance on the width of the rail head the correct distance apart (shown above). The final pice of the puzzle which was started a while back was another jig to hold the sleepers at the correct spacing. This is merely an eight foot strip of 1/2" ply with two softwood runners down each edge between which the sleepers sit (also shown above). The lonitudinal spacing was marked out on the ply and three oval nails driven in around the edge of each sleeper so that on completion the track section can be lifted from the jig. The sleepers are 12" long to give stability and also a narrow gauge appearance and the ideal aesthetic appearance of the track sections would have been 6 sleepers per metre this would also have reduced the cost. However it was felt with the 8" axle centres of the passenger car bogies this may not have given sufficient support to the rail (bearing in mind it will accomodate one adult and three to four children) so 8 sleepers per metre (20 per 2.5m length) was finally decided upon. Having spent @ five hours in preparation by manufacturing the jigs it took @ 1 1/2 hours to produce the first track section - driving all 80 screws by hand. In subsequent sections I think the cordless drill will be emplyed to drive the screws! Below is the first section in position with the chasis of the passenger car stood on it! The position of this track section is about mid point on the line, it will run from the garden gate in the distance back up towards the house although the relocation of the greenery is still under negotiation with the horticultural department!

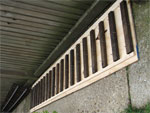
Below are the first three three track sections laid in position running from Fox Hollow down to the Garden gate. There are two more to assemble before I reach the location of the point back up towards the house.
Jun 06; On 6th June 2006 six lengths of track were finally connected together and the first train run on the line. The next step is the construction of the point!
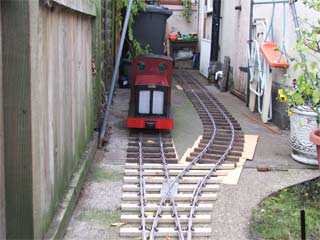
Oct 06; Finally the point was completed together with two more sections of track (one straight and one curved) to a stage where a train could be run over the full length of the line. On 15th October the full length of track was laid and Hagan dug out of storage to test the point. Initially the loco was pushed through the curved side of the point and it immediately derailed! Initial thoughts were that the radius of the curve was too tight for the loco even though this had been anticipated and gauge widened through the curve by about 3mm to allow for the fact the frog was straight cut. However laying on the ground and slowly pushing it through again immediatly revealed the problem, the check rail was holding the wheel set too far over and the opposite wheel flange was climbing over the frog rather than following through the groove. Initial trials during the construction of the point with the bogie chassis showed no such problem but it was then noted that the back to back wheel dimensions for these bogies were quite wide. Slackening off the securing bolts for the check rail and packing it over a little solved the problem and hey presto the loco slowly motored it's way through the point. So far, so good, the next step was to get the passenger trolley to follow suit. Again initialy the imediate result was derailment and a staunch refusal to run through the point from the main line to the workshop branch. It was remembered that when the trolley was assembled the articulation of the bogies was limited by the size of the body so some quick work with a chisel provided a little extra clearance. The other flaw in the design noted on initial trials on the straight was that although the bogies were compensating the side beams being pivoted in the centre, there is no allowance for a long slow twist in the track as there is no relative movement between the two main bogie frames. Checking across the point showed a twist so packing was introduced to compensate and on checking again there were no problems. Loco and carriage were coupled together and the first run commenced - Success!
There still remains plenty of jobs to be done before we are properly up and running, the immediate tasks being manufacture of some buffer stops and finishing the cosmetics of the point by creosoting the new timber sleepers and making the weight for the point lever, folowed by production of some proper packing pieces in place of the layers of hardboard offcuts which look decidedly scrappy and unprofessional! With winter starting to close in I dont think there will be any further running this year and before next season i want to complete the second carriage using the chassis aquired from Herne Bay (Peter Thorntons Railway).